

A Step-by-Step Guide for Clients
This guide explains how clients can post a project and hire the right freelancer on the platform by following the exact workflow available in the client dashboard.
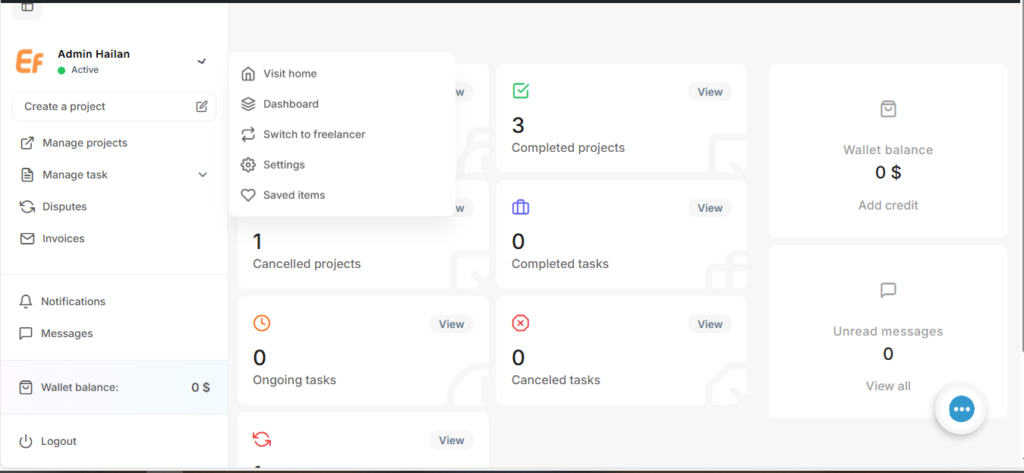
Step 1: Access the Dashboard and Create a Project
After logging in, the client is taken to the Dashboard, which shows project statistics, messages, invoices, and wallet information.
To start posting a project, click Create a project from the left sidebar.
This action opens the project creation process.
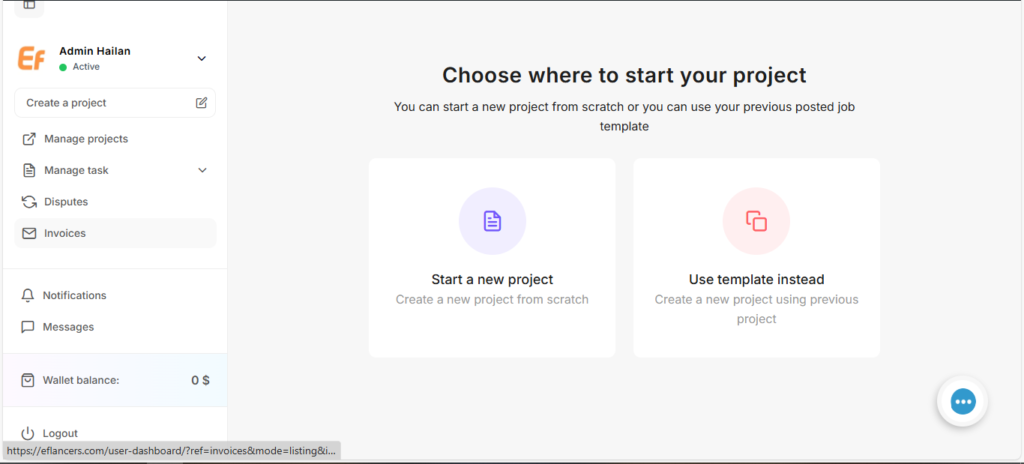
Step 2: Choose How to Start Your Project
The platform asks you to choose where to start your project.
You will see two options:
- Start a new project
Choose this option to create a project from scratch. - Use template instead
Choose this option to create a new project using a previously posted project as a template.
Select one option to continue.
Step 3: About Project – Add Project Details
In this step, you define the main information about your project.
You will enter details such as:
- Project title
- Project description (what you need, goals, and expectations)
- Category
- Sub-category
- Project type
- Fixed price or Hourly rate
- Project duration/number of days
- Any additional instructions that help freelancers understand the work clearly
Providing clear and detailed information helps attract the most suitable freelancers.
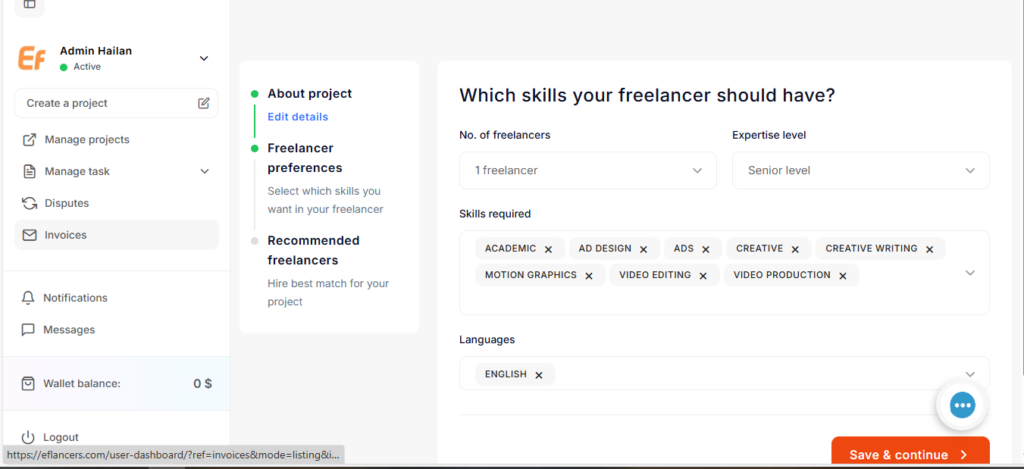
Step 4: Freelancer Preferences and Attach Samples
In the Freelancer Preferences step, you define the type of freelancer you are looking for.
You can select:
- Number of freelancers (example: 1 freelancer)
- Expertise level (example: Senior level)
- Skills required, such as:
- Academic
- Ad Design
- Ads
- Creative
- Creative Writing
- Motion Graphics
- Video Editing
- Video Production
- Language (example: English)
Attach a File or Link (Optional)
At this stage, you can also attach a file or add a link as a reference for freelancers.
This may include:
- Sample designs or videos
- Documents or briefs
- Links to similar work you expect
Adding samples helps freelancers understand your expectations more clearly and submit better proposals.
After completing this step, click Save & Continue.
Step 5: Hire Freelancers or Wait for Bids
After setting freelancer preferences, the platform shows a list of Recommended Freelancers based on your requirements.
Option A: Review and Invite Recommended Freelancers
You can review freelancers before inviting them by clicking View profile.
Inside the freelancer profile, you can:
- Review skills and experience
- Read ratings and client reviews
- See profile views and past performance
If the freelancer is suitable, click Invite to bid to invite them directly to submit a proposal.
This option is ideal if you want to hire faster and target specific freelancers.
Option B: Publish the Project and Wait for Bids
If you prefer to receive offers from more freelancers, click Go to project listing.
This publishes your project publicly, allowing freelancers to find it and submit bids naturally.

Conclusion
Posting a project and hiring a freelancer follows a clear and structured process:
- Access the dashboard and click Create a project
- Choose to start a new project or use a template
- Add project details (title, description, category, type, duration)
- Set freelancer preferences and attach samples
- Review recommended freelancers or publish the project and wait for bids
Ready to hire the right freelancer? Post your project now.
Leave your comment